Sunday, December 15, 2013

Pretty Meringue Decorations


Being a huge foodie, I hang edible treats on my Christmas tree every year and this year I decided to make some meringue circles. I must admit however that they only lasted the day and every single one of them was eaten before lights out. Nevertheless they are great fun to make with little ones and they look so pretty. You can make them whatever colour you like by adding your preferred food colouring to the finished meringue mixture, I chose pink as I'm super girly.


Ingredients
  • 4 eggs, room temperature
  • 220g caster sugar
  • Red food colouring
  • Pretty ribbon for hanging


Method
  1. Preheat the oven to 140 degrees
  2. Separate the eggs and put the egg whites in a food mixer with the whisk attachment
  3. Whisk the eggs for 5 minutes, on medium speed.
  4. Add the sugar little by little, increase the speed of the whisk and continue to whisk for 8-10 minutes, until you have stiff peaks.
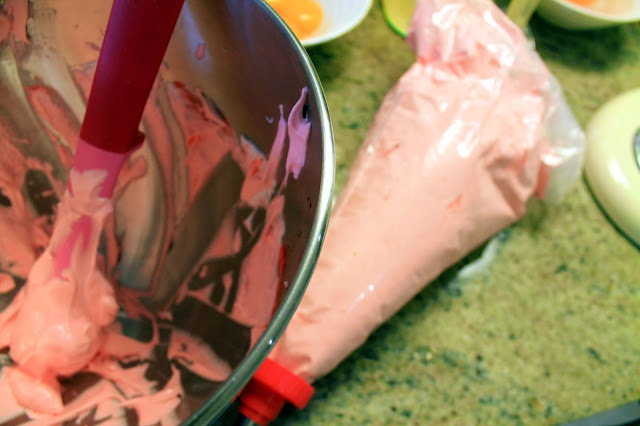
  5. Whisking slowly, add the colouring until you have reached the desired  colour.
  6. Put the meringue into a piping bag.
  7. Pipe out thick circles onto baking trays lined with baking paper.
  8. Place the trays in the oven and bake for 25 minutes
  9. Cool on a wire rack.
  10. Using a ribbon hang the meringues on your Christmas tree. Keep them away from the fairy lights if you can as the heat can melt the meringues.

Easy Peasy Mince Pies


I don't have a lot of time these days for baking and blogging, but these mince pies are all about the short cuts and are a doddle to make, so easy I just had to share the recipe. I'm a self proclaimed lover of store bought pastry, it makes everything so quick and easy.


 These pies are made using store bought pastry, but good quality pastry. The mince pie filling is also straight from a jar, but I'm using a luxury brand. Basically I'm all about the shortcuts once the very best store bought items are used. There then is nothing stopping you pimping up store bought ingredients. For example here I jazz up the mince filling with some clementine zest and chopped apple.

So on first glance of the pies you think 'oh I don't have the time to make those'; but read on and see how easy it is to make your own.


Makes 9 mince pies

Ingredients

  • 1 ready rolled premium quality shortcrust pastry
  • 1 jar of luxury mincemeat
  • 1/2 an apple, diced
  • Zest of 1 clementine 
  • 1 tbsp of milk
  • Butter, for greasing muffin tray
  • Icing sugar, for dusting


Method

  1. Preheat the oven to 180 degrees, and grease a muffin tin with butter
  2. Empty the mincemeat into a bowl and add the zest and the chopped apple and stir to combine.
  3. Roll out the pastry and using a round pastry cutter, cut out as many circles as you can. 
  4. With the scraps, re-roll and cut out some star shapes for the top of the pies.
  5. Place the pastry circles in the muffin holes and add the mincemeat filling. Do not be tempted to overfill them as they will burst and overflow when baked.
  6. Top each pie with the cut out pastry stars. Brush the stars with a little milk.
  7. Bake in the oven for 20-25 minutes until they are bubbling and golden brown.
  8. Cool in the tin on a wire rack for 5 minutes before removing from the rack and allowing to cool completely.
  9. Dust liberally with icing sugar and hey presto.


If you are visiting over the festive season, these are the prefect gift to bring your friends and family. Everyone loves homemade gift, especially ones that look like you were slaving in the kitchen for hours making. They need never know how easy and quick they were.

In a make ahead tip, you can freeze the pies in the muffin tray unbaked (covered with cling). Then just defrost overnight in the fridge before baking them.


Tuesday, November 12, 2013

Sika Lodge's Mango & Passionfruit Granola Cups


My homemade granola in Sika Lodge never lasts long, I am constantly restocking it, and jokingly telling my husband he's not to have it, it's for the guests.........much to his disgust!!These granola cups are made as a little treat for my guests, simple to assemble and very tasty, not to mention healthy.


*The mango & passionfruit puree is made from a can of mango slices, just whizzed with a hand blender and then cutting a passionfruit and mixing the seeds through the mango.


Follow my link to see how I make the homemade granola, but you can of course use store bought granola. http://serenasmediumrare.blogspot.ie/2013/07/sika-lodges-homemade-granola.html. I don't use exact quantities in my ingredients, it all depends on the number of granola cups you wish to make. Leftover ingredients can be kept in the fridge in air tight containers.


Ingredients

  • Granola
  • Greek Yogurt
  • Mango & Passionfruit Puree*
  • Whole, washed raspberries.


Method
  1. Spoon the granola into the base of glasses, I use wine glasses.
  2. Top the granola with a thick layer of Greek yogurt.
  3. The final layer is some mango puree, level it out evenly on top of the yogurt.
  4. Place a raspberry in the centre of each cup.
  5. For a final flourish, sprinkle a pinch of granola over the fruit
  6. Chill until ready to serve.


Cheats Gold Star Chocolate Chip Cake


I baked this cake to mark my daughters six month 'birthday' last month. I was up against the clock with work in the B&B, and had told my family to drop by for cake, so I adapted my Quick Blueberry & Apple Cake (http://serenasmediumrare.blogspot.ie/2013/04/quick-apple-blueberry-almond-cake.html) recipe to made a super fast and easy chocolate 'birthday' cake. My little cheat in the process came in the form of pre-made butter cream frosting courtesy of Better Crocker - a lifesaver in last minute baking dilemmas. The frosting tasted great also which was a surprise. I would use it again in a bind hands down! 


This recipe is for your basic chocolate sponge, and in fact I use the same ingredients and quantities for my breakfast muffins for the B&B. How you wish to decorate the cake is totally up to you. I took the lazy approach with Dr Oetker edible gold glitter spray, Betty Crocker buttercream frosting, and Milky Way Chocolate stars. If anything else, its great practice for the actual '1st Birthday' cake. If you want to be super indulgent, double the recipe, bake 2 sponges and sandwich them together with chocolate buttercream frosting..........now that's a cake I'll be baking in the future...


Anyway, here's how I made the chocolate cake. It's seriously simple and yet impressive to look at, people would think you had been slaving for hours.

Ingredients

  • 200g self raising flour
  • 25g of cocoa powder
  • 100g of chocolate chips
  • 165g of caster sugar
  • 125ml of milk
  • 125g butter, melted 
  • 2 large eggs

Decoration

  • 1 12oz carton of Better Crocker buttercream frosting
  • 10 mini bags of milky way gold stars
  • can of gold food glitter spray


Method

  1. Preheat oven to 160 degrees and line a spring form tin
  2. In a food mixer, add all the  dry cake ingredients first and stir to combine
  3. Add  the eggs, butter, milk and vanilla extract to a jug and whisk to combine.
  4. Add the wet ingredients to the dry and mix until just combined (do not over whisk)
  5. Scrape it into the cake tin and level it out evenly.
  6. Bake in the centre of the oven for 45 minutes.
  7. Check that the cake is fully baked with a skewer before removing from the oven (Insert skewer to centre of cake if it comes out clean it's done, if not bake for a further 5 mins and try again)
  8. Leave to cool on a wire rack before decorating.
  9. Using a spatula, spread the buttercream out evenly over the cake.
  10. Dot the chocolate stars in a uniform fashion all over the cake.
  11. Spray the whole cake lightly with the gold spray. (optional of course, but in for a shilling, in for a pound)

Monday, September 30, 2013

Nasi Goreng


Nasi goreng reminds me of my time spent travelling Bali/Lombok in Indonesia. I had nasi goreng every single day for brunch. It normally came served with a yellow prawn cracker the size of the plate. Such simple ingredients, but the dish is full of flavour and packs a punch. Lots of ingredients are required, but the vast majority of them are in the back of the store cupboard. This is the Indonesian version of Chinese takeaway special fried rice, but way healthier and infinity tastier!


Ingredients

Paste

  • 1 thumb-size piece of peeled and chopped ginger
  • 1 stalk of lemongrass, bruised and chopped
  • 3 shallots, peeled and chopped
  • 3 garlic cloves, peeled and chopped
  • 1 red chilli, deseeded and chopped
  • 1 tbsp of Heinz Ketchup
  • 1 tbsp of coriander seeds
  • 1 tbsp of fish sauce
  • 1 tbsp of soy sauce
  • 1 tbsp of brown sugar
  • 1/2 tsp of shrimp paste
  • 2 tbsp of peanut oil
  • 2 tbsp of roast peanuts

  • 2 breasts of Moy Park Chicken, sliced into thin strips
  • 200g of raw king prawns
  • 250g of cooked and cooled basmatic rice
  • 2 shallots, chopped
  • 1 garlic clove, chopped
  • 3 tbsp of roast peanuts
  • 3 tbsp of chopped fresh coriander
  • 1 lime, cut into wedges
  • 4 eggs
  • 2 spring onions, chopped
  • 1 cucumber, peeled and cut into 'half moons'


To serve
Prawn Crackers, sweet chilli sauce and soy sauce.

Method

  1. Firstly make the paste, put all the paste ingredients into a  mini blender and whizz until it comes together as a smooth paste.
  2. In a wok, add two thirds of the paste and fry it off for a few minutes. Add the chicken and stir fry until cooked through, in the last 2 minutes add the prawns and continue to stir fry until the prawn have turned a lovely coral pink. 
  3. Remove the chicken and prawns from the wok and set aside.
  4. Add the remaining paste and fry it in the wok with the shallots and garlic. 
  5. Add the rice and stir fry it for a few minutes. 
  6. Return the chicken and prawns to the rice and stir to combine.
  7. Get a frying pan on heat and fry 4 eggs (soft yolk)
  8. Add the cucumber, coriander, peanuts and spring onions to the fried rice.
  9. To plate up, divide the mixture between 4 plates and top each rice mixture with the softly fried egg.
  10. Serve with prawn crackers and sweet chilli sauce drizzled over the egg.


Friday, September 13, 2013

Courgette, Cheddar & Dill Scones


I have been making sweet scones all summer for the B&B, the most popular being my Raspberry Scones. Now as the season is over, I find myself getting a bit bored with my recipes and decided to change things up for a change and make something savory. There's a shop in town I'm always passing and I always see cheesy scones in behind the glass counter so it gave me food for thought.


So here are my Courgette, Cheddar and Dill Scones, perfect breakfast scone, and absolutely fabulous straight from the oven hot for your 11am tea break.


Makes 8 scones

Ingredients

  • 300g of self raising flour
  • 1 tsp of salt
  • 1 medium courgette, grated
  • 100g of sharp red cheddar cheese, grated
  • 3 tsp of chopped fresh dill
  • 250g of buttermilk
  • 1 tsp of caster sugar


Method

  1. Preheat oven to 200g and line a baking tray with parchment paper.
  2. Wrap the courgette in kitchen paper and squeeze the moisture out.
  3. Sieve the flour in a bowl and add the salt, sugar, cheese, courgette, and dill.
  4. Combine all the ingredients well.
  5. Make a well in the centre of the bowl and pour in the buttermilk.
  6. Stir until and dough is formed, and turn out on the counter top,
  7. Roll into a flat circle and cut into quarters and then into quarters again.
  8. Transfer to baking tray and bake in oven for 25 minutes.


Serve warm with lashings sun dried tomato butter. (Whizz sun dried tomatoes, salt, pepper and butter in a food processor. Transfer to a container and refrigerate into firm.)


Saturday, August 31, 2013

Spicy Monkfish Ceviche


Ceviche is a method of cooking fish in lime juice, no heating element required. This would make this a super dish for 'cooking' on a camping holiday or even on a picnic. However, you must ensure to use the freshest possible fish from your fishmonger.

Some people would have an automatic aversion to the thought of eating monkfish after just been soaked in lime juice. But once you taste the fish and experience the utter tenderness of the monkfish (when overcooked on heat can be chewy and tough), you'll never want to cook monkfish the conventional method again. 


This is a superb dish to cook as a starter for a dinner party, or simply for a drinks party using tortilla chips as you spoons.

Serves 2 as a starter

Ingredients
  • Monkfish, 2 portions (get fishmonger to take the membrane off and to fillet it)
  • 4 limes, juiced.
  • 1 jalapeno pepper, sliced thinly (or red chilli)
  • 4 spring onions, diced.
  • 2 tbsp of oil
  • Salt & pepper


To Serve
Chopped Fresh Coriander, extra limes and tortilla Chips

Method
  1. Cut the monkfish into very small pieces and place in a wide shallow bowl.
  2. Add the lime juice, half the jalapeno pepper and half the spring onions. Also add the oil and pepper.
  3. Allow to marinate for 15 minutes and then drain to prevent further cooking.
  4. Place in a clean bowl, season well and freshen it up with the remaining spring onions and jalapeno pepper.
  5. Serve with fresh coriander, lime wedges and tortilla chips.


Seriously addictive!!


Wednesday, August 28, 2013

Mussels & Chorizo in Irish Cider Cream


This dish is a favorite of mine and my husband and always reminds me of a little side lane bistro we had lunch in when we were in Paris. I love anything at all with chorizo in it as a I simply adore the smoky, spicy flavour it gives off; So pairing mussels with chorizo is, for me,  a match made in heaven. This dish is a main course for 2 people (hungry people), but it is also an awesome starter for 4 for a dinner party. There are only 5 main ingredients for this dish and the cooking time takes literally minutes. The longest part of this dish is preparing (cleaning and debearding) the mussels.


To prepare mussels simply, throw the fresh mussels into a sink and scrub them clean and ensure that they are all closed. If they are open, tap them gently on the counter. If the close, then they are ok, if they remain open, then discard. Use a butter knife to debeard the mussels and then put them in a bowl of cold water ready for using. My mussels were so fresh they even had a little crab wriggling around in amongst them. I freed the poor little guy, however I don't know how long he would survive outside. Poor guy! Wrong place, wrong time!

Once you have your mussels prepped then, cooking the dish takes hardly no time at all.


Ingredients

  • 2.5 - 3kg Fresh mussels, washed and debearded
  • 150g chopped chorizo 
  • 3 shallots, diced
  • 500ml of bulmers cider
  • 200ml of pouring cream
  • Pepper
  • Lemon wedges
  • 2 tbsp of olive oil


To serve
Garlic bread & lots of freshly chopped flat leaf parsley.

Method

  1. In a pan with a lid, on a medium to high heat, saute the shallots and the chorizo for a few minutes in the oil.
  2. Then add the mussels and the cider. Bring to the boil.
  3. Place the lid on the pan and cook the mussels for 4 minutes.
  4. Remove the lid and add the cream, pepper and parsley.
  5. Serve with lemon wedges and garlic bread.


Tuesday, August 20, 2013

Chicken, Mango & Mint Fresh Spring Rolls


I don't know if I mentioned before that Vietnam is my favorite country in the world I've visited, partially because of the food and partially because of the people! Well I was introduced to so many new flavors/foods on my trip to Vietnam, but one thing that stands out from memory has to be fresh spring rolls!

I remember even exactly where I came upon them for the very first time. It was in a cute little restaurant in the little tailoring town of Hoi An. It was along the river and the restaurant came recommended to us by travelers we had met in our hotel. We had been in Vietnam 2-3 weeks at this stage and at every meal we always ordered spring rolls, the gorgeous small deep fried morsels of heaven!!! Here they asked did we want fresh spring rolls and to me that meant freshly made, not frozen. I remember being embarrassed when the fresh spring rolls and I ask why they weren't cooked!!!

Now I'm on the lookout on every Asian menu for fresh spring rolls!!! They are divine and not to mention so healthy. It's such a shame down here in southern Ireland there are no Vietnamese restaurants. But luckily my local supermarket just started to stock the rice paper wrappers, so now I can make them myself any time I want them

Ingredients

Makes 10 spring rolls

  • 2 chicken breasts, cut into thin strips and poached. (or leftover roast chicken is great)
  • 1 mango, cut into thin strips
  • 100g of thin rice noodles (soaked in boiled water for 10 minutes)
  • 10-20 mint leaves
  • 10 rice paper discs


Peanut Dipping Sauce

  • 2 tbsp of peanut butter
  • 1 tbsp of hoisin sauce
  • 1 tbsp of soy sauce
  • 1 tsp of chilli paste
  • 1 crushed garlic clove
  • 1 tsp of tomato paste
  • water to thin the sauce to desired consistency


Method

  1. First make the sauce. Add all the sauce ingredients to a pan and bring to the boil, add water to give you the consistency you require.
  2. To assemble the spring rolls, have all your ingredients lined up assembly-line style.
  3. Drain the noodles well, and ensure the chicken is seasoned.
  4. Take a wide shallow bowl and fill it with water.
  5. Take 1 rice paper disc at a time, soak it in the water for 10 seconds or until it become pliable.
  6. Lay it on a flat surface in front of you.
  7. Add a strip of chicken, mango and some noodles to the bottom quarter of the rice paper. Top it with mint leaves and roll it away from you tucking the end under the ingredients wrapped. 
  8. Take in both sides of the roll to the centre and then continue to roll up till the end.
  9. Place on a plate and cover with wet chicken paper, whilst you repeat the process with the remaining 9 spring rolls.
  10. Serve immediately with the dipping sauce.


Tip: You can use any fillings you wish, i.e prawns or pork and carrots or red pepper strips. Mix and matching is great!


Related Posts Plugin for WordPress, Blogger...