Friday, November 23, 2012

Choc- Chip & Orange Christmas Buns


For those of you looking to get ahead this holiday season, here’s a twist on my muffin recipe, perfect for the Christmas season ahead.
I plan on making these and bringing them to friends and neighbours houses I’ll be visiting over the Christmas holidays. Its all grand to bring a tin of Caburys Roses or a box of Lemons Season Greetings as a house gift…..but I think a home baked gift is a much more thoughtful present.


These are perfect Christmas treats for kids as they look like traditional Christmas puddings, however they don’t taste as heavy as a pudding and of course do not have any alcohol. Well, they are hardly innocent….but I can guarantee they are light & fluffy and chocolate-y!!! Perfect for little ones, and also for the kid inside all of us when it comes to Christmas.

To ensure I get them muffins perfect, I wanted to practice them now so come Christmas; I’ll be making batches in my sleep!!!! Plus if you are anything like me, you will have something on every weekend in the month of December and pulling your hair out trying to find the time to get all prepared.

If you have small little kids at home, this is a great recipe to get them involved in the kitchen, and they will love to be Chief Decorator!!!

Makes 12 muffins

Ingredients

·         150g Caster Sugar
·         400g Plain Flour
·         1 tbsp Baking powder
·         260ml Buttermilk
·         2 Eggs
·         Salt, pinch
·         85g Butter
·         Zest of 1 orange
·         100g of chocolate chips

Decoration

·         100g White Chocolate
·         12 Raspberries


Method

1.       Preheat the oven to 180 degrees, and grease a muffin tray.
2.       In a food mixer sieve in the flour, sugar and baking powder.
3.       Add in the orange zest
4.       And mix on a low setting for 30 seconds to incorporate everything.
5.       In a jug, crack the eggs and add the buttermilk and melted butter.
6.       Whisk to combine.
7.       With the food mixer on the lowest setting, slowly add the liquid mixture to the dry ingredients.
8.       With a metal spoon, stir in the chocolate chips, and your bun mixture is complete.
9.       Spoon the mixture in even quantities into the muffin tins. 
10.   Bake in the oven for 20 minutes.
11.   Allow to cool for 5 minutes before removing the buns to a wire rack.
12.   Melt the white chocolate in the microwave. Break up the chocolate into square and microwave on a low heat in 40 second blasts, stirring each time until you have a smooth consistency.
13.   To decorate the buns, using a teaspoon to spoon a the melted chocolate over each bun. We are not looking for neatness, in fact the more the chocolate drips down the sides the better, as this will give the appearance of icing on a Christmas pudding.
15.   Before the chocolate sets, place a raspberry in the centre of each bun.


Wednesday, November 14, 2012

Italian Inspired Slow Cooked Shoulder of Lamb


When holidaying in Sicily I had the good fortune one night of choosing the lamb dish on the menu in a local trattatoria, the lamb was so divine I vowed to try to recreate a similar dish when I got home. The cut was a lamb shank and the meat was so juicy and tender there was no need for a knife at all; and you just knew it had been cooking for hours.

On my trip to my butchers to buy the lamb shanks to try to recreate the dish, I was disappointed to learn that they wouldn’t have shanks this week. Being one never to give in, and one who hasn’t an atom of patience I decided to get a shoulder of lamb boned and rolled instead. I wasn’t going to let a lack of shanks scarper my plans for dinner!!


I decided to pair the lamb dish with a white bean mash instead of pasta or potatoes, much to my husbands disgust! He saw the lack of potatoes (spuds) as ludicrous. However he was singing a different tune when he tasted the bean mash. So I’d definitely recommend giving it a go. I got the inspiration for this from a Nigella Lawson episode.

 
I don't claim this to be an authentic Italian recipe, but this is my take on a wonderful meal I had in Sicily.

 I would add some juicy black olives to the end dish normally, but as this was a birthday dinner for the hubbie, (who hates olives) I decided to leave them out). 
So here’s how I did it, my Italian Inspired Slow Cooked Shoulder of Lamb; the perfect Sunday winter warmer!!!


Serves 4

Ingredients

·         1kg shoulder of lamb, boned, rolled and tied (by your butcher)
·         Olive oil
·         Salt/pepper
·         4 sprigs of rosemary
·         2 cloves of garlic, diced
·         1 white onion, chopped
·         4-5 carrots, peeled and cut into wedges
·         1 tbsp tomato puree
·         2 glasses of white wine
·         1 tin of chopped tomatoes
·         Pinch of sugar
·         2 Bay leaves


White Bean Mash

Ingredients

·         2 tins of cannellini beans, drained and rinsed
·         ½ tsp of chopped rosemary
·         ½ a clove of garlic, minced
·         Salt & pepper
·         A knob (or 2) of butter
·         2-3 tbsp of extra virgin olive oil.


Method

1.       Preheat the oven to 180 degrees
2.       Season the shoulder well with salt and pepper
3.       In a large frying pan, add the oil and sear the meat on all sides until browned
4.       Add the rosemary and toss to infuse the meat
5.       Remove the meat to a casserole dish.
6.       Deglaze the pan with the white wine and allow to bubble for a moment or two.
7.       Add the garlic, onion and tomato puree. And sauté for a few moments
8.       Add the carrots, rosemary, sugar, and tinned tomatoes.
9.       Refill the empty tomato tin with water and add this to the pan.
10.   Once the liquid has come to a boil, then pour over the lamb into the casserole dish.
11.   Cover the dish and put in the oven for 2 ½ to 3 hours.
12.   To make the mash, sauté the garlic in a little oil with the rosemary.
13.   Add the beans and warm through.
14.   Using a potato masher, mash well ( I like it chunky)
15.   Add the seasoning, butter and oil and mix well.
16.   Keep warm until needed.

I must apologise for the end dish pictures. The problem I find with slow cooked meats is it can be quite a task to make them look super pretty & attractive and plated up in a mega fancy way. This is what it is, which is a modest and delicious home cooked dish - no frills, no beauty contest winner, just seriously good meat.

*** Rest meat for min. 15-20 minutes under some tinfoil before cutting****


Monday, November 12, 2012

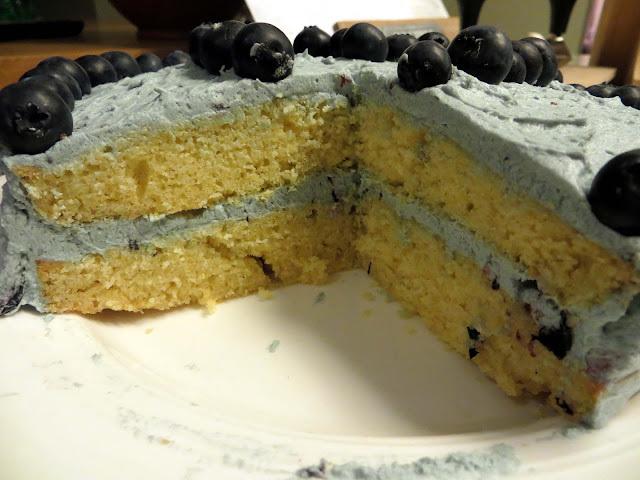
Blueberry Buttercream Sponge Cake


What better way to test drive my brand new Artisan Kitchen Aid mixer, than to bake a cake! I got the Kitchen Aid from my husband as a birthday present a few weeks ago, and no better start than to make his own birthday cake with the maiden voyage.

I'm new to cake baking, but with the Kitchen Aid, I have found it very easy. I've also found this recipe to be very adaptable......I made a Strawberry Buttercream Sponge Cake for my mother's birthday a few months ago, using the same recipe just substituting the strawberries for blueberries and using whipped cream and strawberry jam as the filling instead of the buttercream icing, as I have here.

Basic Sponge Recipe

Ingredients

  • 175g of caster sugar
  • 175g of butter
  • 175g of flour
  • 3 large eggs
  • 1 tsp of baking powder
  • 1 tsp of vanilla extract

Method
  1. Preheat the oven to 180 degrees and butter 2 round cake tins (20cms diameter)
  2. In a food mixer, add the butter. 
  3. Soften the butter by turning on the mixer to the lowest setting. Add the sugar gradually whilst the mixer is going, until all the sugar and butter are fully incorporated.
  4. Whilst the mixer is still going add the eggs one by one, allowing to each egg to be mixed in, add the vanilla extract also
  5. Sieve the baking powder and the flour into the mixer and just mix until incorporated.
  6. Divide the mixture equally between the two cake tins.
  7. Bake in the oven for 20 minutes before allowing to cool completely on a cooling rack.

Blueberry Buttercream Frosting

Ingredients
  • 150g of butter, softened
  • 300g icing sugar
  • 50g of blueberries, blitzed
  • 1 tsp of vanilla extract
  • 2 tsp of blue food colouring

Method
  1. In a food mixer, completely blend the butter and while the mixer is on its very lowest setting, add the icing sugar a little at a time allowing each scoop to be incorporated into the butter before adding the next scoop.
  2. Add the blueberry puree and vanilla extract and mix into the buttercream.
  3. Finally add the food colouring and give a final mix to blend everything together.

Assembling the Cake

  • 20-30 blueberries to decorate required

Method
  1. Place one sponge on a cake stand or plate
  2. Using a spatula, smooth on a layer of buttercream, and spread evenly.
  3. Top with the other sponge, and spread the top with another layer of buttercream.
  4. Using a warm spatula, spread the buttercream around the sides and even and smooth it out.
  5. To decorate the cake, place a line of blueberries around the edge of the cake. You may wish to repeat this with many smaller circles into the centre of the cake, however I just used a simple love heart design as the cake was for my husband.(and I ran out of blueberries)


HAPPY BIRTHDAY ALAN!

Monday, November 5, 2012

Quick Catch Up, Home Cook Hero Awards & Scallops


It certainly has been a long time since I’ve been regularly blogging. I’ve been so bold, but so, so busy it had to go on the way side for just a little bit.


There has been loads happening lately which put the blogging to one side. I’ve recently been on a road trip of Sicily sampling all the wonderful island has to offer. I intend to cook up my version of my favourite dishes from our trip…….think Pasta con le Sarde and Caponata and you get where I'm going.


But before all that…… I must give a moment or two to talk about making the final of Easy Food Magazine Home Cook Hero 2012 in the Catch of the Day category for my Scallops & Curry Dhal.

Great honour to make it to the final 3 for the category and to get to participate in the cook-off  in Cooks Academy in Dublin over the weekend. The Cooks Academy was buzzing with excitement and nerves, and I got to meet lots of wonderful people who love to cook and also meet the people who work on Easy Food Magazine (my food magazine of choice). It was a fantastic experience and the judges included 2 top food TV personalities.
There were 10 different categories with the youngest entrant being just 5 years old, bless her!

The day was topped off with a Black Tie Ball in The Shelbourne Hotel (if you don’t mind), it was well fancy! A wonderful evening of food and laughter and conversation was had, and although I didn’t win; to be involved was truly enough for me.
Anyone thinking of entering next year, I say ‘DO IT!’. Great event!!!!

Just to be nostalgic, here’s my recipe again for the Scallops and Curry Dhal.
(Kevin Dundon recommended to me to replace the curry dhal with a cauliflower mousse, so watch this space for an attempt at that dish)


Scallops on Curry Dhal, with a Minty Yogurt Dressing

Ingredients


 For the Scallops
  • 6 fresh scallops, washed, dried, coral removed
  • Olive oil
  • Salt & pepper

For the Curry Dhal
  • 1 cup of yellow split pea lentils (cooked according to packet instructions)
  • 1 tsp cumin seeds
  • 1 tsp coriander seeds
  • 1 tbsp of chopped coriander
  • ½ diced red chilli
  • 1 tsp of turmeric
  • 1 tsp curry powder
  • 1 diced red onion


For the Minty Yogurt Dressing 

  • 3 tbsp natural yogurt
  • Juice & zest of half a lemon
  • Salt & pepper
  • 1 tsp finely chopped mint leaves

  1. Cook the split peas in boiling water for 45 mins
  2. Drain them and set aside
  3. In a dry pan, add the cumin seeds and coriander seeds and heat for 3 mins
  4. Transfer to a pestle and mortar and grind to a powder
  5. Add oil to the pan, and sauté the onions, garlic, chilli with the ground spices and curry powder and turmeric
  6. Add the lentils back to the pan and warm through, add water so the mixture isn’t too dry.
  7. Add chopped coriander. Set aside until required. This mixture can easily be reheated in the pan, adding water to keep the mixture wet.
  8. Wash and dry the scallops, and season with salt, pepper and oil.
  9. To make the yogurt dressing, combine yogurt, finely chopped mint, 1 tsp of honey, salt, pepper and half the juice of a  lemon. Refrigerate until required.
  10. To cook the scallops, put a dry pan on a high heat.
  11. Add the scallops to the pan in a clockwise direction.
  12. Turn after 90 seconds, and sear on other side for 60 seconds
  13. To plate up, put  3 tsp of the dhal mixture in a row on a plate, top each dhal with a scallop and drizzle over the yogurt dressing.


Related Posts Plugin for WordPress, Blogger...