Wednesday, April 11, 2012

Rome: A Culinary Weekend Treat


Rome…A wonderful getaway for some history, good food and wine!!

Just back from spending Easter weekend in Rome, still  recovering from the wine, cocktails and lemoncello, not to mention the carb feast of a weekend.

We arrived quite late on Friday night and decided to take up my parents’ recommendation of a restaurant not far from our hotel on Via Nazionale. Relatively easy to find Elettra on Via  Principe Amedeo, was definitely worth a seek-out. The staff are falling over you nearly with their friendliness and greeted us with complementary prosecco whilst we mulled over the menu.
I had made a decision to myself to try food I hadn’t tried before and but with all my favourites on the menu, it proved a difficult decision. For starters here I had a classic bresola, rocket and parmesan dish, with Alan going for his favourite, Parma ham & melon; another classic. Both dishes would be a doddle to prepare at home for a dinner party when under pressure. It’s just a quick assembly job, and like this restaurant, provide a rustic basket with crusty ciabatta and good olive oil and balsamic vinegar.
I will definitely try to recreate my main course as an impressive dinner party dish…Turbot with Artichokes and Cherry Tomatoes…Divine. I imagine pulling this dish off would be mainly down to having excellent quality ingredients as there was nothing else to the dish. The turbot, perfectly cooked, was beautifully succulent, sweet cherry tomatoes and artichokes with just the right amount of zing! The perfect balance for a truly authentic Italian fish dish.
Alan went for a classic Saltimbocca al Romana, which was Veal, Sage and Parma ham with a marsala reduction.  It was just simple but also pure class. I think I will try this one with either chicken or pork, as veal is not an everyday staple of ours, but I think chicken will work quiet well and a great crowd pleaser. Only one night down and I’ve already 2 great mains to try to create at home Serena Medium Rare style.

Day 2 involved a very fast train (my ears popped going through tunnels), to Pompeii. It would have been the highlight of the trip if only for the constant torrential downpour we got from the moment we stepped off the train. Nonetheless we just grinned and bared it, got our guide and did a 2.5 hour tour. It was utterly incredible and a ‘must’ for anyone in the neighbourhood, or who has a day to spare in Rome.

Both my brother-in-law and my sister recommended we dine and drink across the river in the Trastevere area. So we asked our hotel receptionist to recommend somewhere and they said Sabatini in Piazza di Santa Maria in Trastevere. They said it was famous! So we agreed it had to be tried. Wow!! All I can say is wowzers! It was a fantastic culinary experience and urge anyone visiting Rome to eat there. http://www.ristorantisabatini.com/

Alan had a exquisite cold seafood platter to start, which was quite a pricy €14 so I decided to just get something small like soup and share his starter. I decided on the fish soup in a last minute panic when ordering, not looking at the menu price. What was served to me was truly heaven in a bowl. The soup, had a tomato base, but had baby octopus, squid, mussels, hake and jumbo kind prawn. The soup also had two slices of what must have been once stale ciabatta bread, transformed into a flavour soaking sponge. Great idea actually!!! Gonna give that a go in a soup recipe. This soup was so filling in fact I was very worried I would not be able for my seafood risotto main. Then when I licked my plate clean, I laughed at the thought of me not being able to finish a meal!!! The seafood risotto was mainly shrimp and mussels in a tomato base again and the risotto rice had a bite to it, it wasn’t very mushy like the risottos you might get here at home. Alan’s Salmon Penne was a very rich affair, but the plate wasn’t piled too high, so it left a taste of ‘more’ with it. The salmon was minced which was interesting. I think I’d have preferred it whole, but that’s just me being greedy.
We decided we were too stuffed for two desserts, though the atmosphere looking out of the Piazza we were sitting under our gas heater, we said we’d have coffees and share an ice-cream. When the bill arrived, I nearly died, my soup was €22!!!!!!!!!!!!!!!!!!!!!!!!!!!!!!!!!!!!!!! Who orders soup costing €22?????!!!!!!!!
Just as well it was amazing, I was rather ashamed I hadn’t seen the price beforehand!!!!

The final evening for dinner we went back to Trastevere, and after much searching for a restaurant, we found an authentic enough one that didn’t look like a total tourist trap. We have to queue (It was Easter Sunday after all)

We had the Parma ham and melon and deep fried baby squid and deep fried courgette flowers. I’d seen Jamie Oliver do the flowers on TV and was eagar to try them. They were really lovely, but I can only imagine the calories!!!! The main course was beef strips in a tomato sauce, delicious and simple served with a large steamed artichoke on the side; and this I imagine will be a doddle to recreate at home. This restaurant wasn’t as tasty as the night before, but felt equally as authentic and half the price!!!

During the day time we flitted between cafes stopping for yummy bruschetta’s, pizzas, more squid, marinated aubergine slices, spaghetti vongoli, and gelaterias for glorious Italian ice-creams, pistachio being my favourite flavour I decide, after yet another ‘cono’!

I’ll be paying for this gluttonous trip I imagine for some time to come on the cross trainer. Was it worth it though!!.........Every single bite!!!!

Top 5 highlights (in no particular order)

·         Ice-cream in Trevi
·         Pompeii, although wetter than wet, was unbelievable
·         Coliseum – a must!!!
·         The infamous fish soup in Sabatini’s
·         The view of Rome from the Cupola in the Vatican (though the journey up is not for the claustrophobic, as I learnt the hard way)


Thursday, April 5, 2012

Oats & Seeds Fish Fingers


Good Friday is not far away, which means only one thing……Easter eggs are not far behind!!!  Haha.

On Good Friday, more a traditional custom now for us rather than religious, we tend to abstain from meat and embrace all creatures of the sea. I needn’t harp on about how good fish is for you, and how these days the variety we have available to us is wonderful and leaves us with no excuse not to experiment with cooking fish and seafood…… (well I did harp there, for just a second).

For this healthy fish finger recipe, I’m not really experimenting with fish variety, but I have cooked the fish in a way I had never tried before. Trying to be ever health conscious, these fish fingers are baked rather than fried (no surprise there), but the coating for them is using porridge oats, panko breadcrumbs and seeds. This makes the fish fingers super healthy rather than cooking them in a white breadcrumb coating, not to mention a great texture to the fingers. Also they will keep you filling fuller for longer with the use of oats and seeds. They are so healthy, you can increase the chips on your plate!

I would use any firm fish for these fingers, I am using cod and whiting here, as that’s what my fishmonger had freshest, but skinned salmon or coley would work well here.
These are guilt free fish fingers for the kiddies too, adding some peas and baby potatoes and that’s a real easy meal to please the kids. They can help with the prepping of the fingers too, making them more inclined in eating them when they are cooked.

Makes 12-15 fingers

Ingredients

  • 4 fillets of skinned cod
  • 50g of panko bread crumbs
  • 50g of porridge oats
  • 20g of mixed seeds (sesame, sunflower)
  • 1 egg, beaten
  • 50g of flour, seasoned with salt and pepper
  • Low cal spray


Method

  1. Cut the cod fillet into finger/goujon size pieces.
  2. Put the flour on a plate, the egg in a bowl and mix the breadcrumbs, oats and seeds together, and put in another bowl.
  3. Preheat the oven to 180 degrees
  4. Line a baking sheet with baking/parchment paper and spray with low cal spray.
  5. Dip the fingers in the flour, shake off excess, dip in the egg, shake off the excess; and cover in the oaty coating.
  6. Place the fingers in a line on the baking sheet.
  7. Bake in the oven for 10 minutes, then turn and bake for a further 5-8 minutes.


(Alternative for Panko Breadcrumbs: If you don’t have panko breadcrumbs, toast a slice of brown bread, and when cool blitz in a mini food chopper)

Sneaky Accompaniment: a quick lime and sweet chilli mayonnaise – add 3 tbsp of low fat mayo, with juice of half a lime, and 1 tbsp of sweet chilli sauce, black pepper)


Monday, April 2, 2012

Easter Orange Sponge Cake


We are in for another special baking treat, with Regular Guest Blogger, Nicola kindly sharing her recipe for an Easter Orange Sponge Cake, it sounds zingy and delicious and if her pictures are anything to go by, I bet the sponge is as fluffy as the little chickies adorning it!!! Thanks Nikki!!!.....very egg-cited to try it!!!.......

Easter Sunday (Domhnach Cásca) is an occasion for many people to spend the day with family and friends. People in Ireland have marked Easter as the start of spring, the birds begin to lay eggs again and baby animals including Spring Lambs are born.
An Easter dinner menu wouldn't be the same without a sweet treat filled with finely grated orange, then spread with a smooth coating of orange infused icing, this classic dessert will be an extra-special treat for you to make for family and friends or even as an Easter gift for that ‘someone special’.
Easter Orange Sponge Cake
Ingredients
225g/8oz Butter (room temperature)  
225g/8oz Caster Sugar
225g/8oz Plain Flour
4 Eggs (beaten)
1 teaspoon Baking Powder
1 tablespoon Orange Juice
Orange Filling
225g/8oz Icing sugar (sieved)
125g/4oz Butter (room temperature)
Rind of ½  Orange
1 tablespoon Orange Juice
Glace Icing

Orange Sponge Cake - Method
1.          Preheat oven to 180°C/350°F/Gas 4. Grease and base line 2 sandwich tins: 20cms/8".
2.         Put butter and sugar into a mixing bowl and beat until soft and light.
3.         Gradually beat in the eggs, adding a little of the flour.
4.         Sieve the remaining flour with the baking powder and add to the creamed mixture.
Mix well.
5.         Finally, stir in the orange juice.
6.         Divide the mixture evenly between the two tins, hollowing it slightly in the centre.
7.         Bake for 35 minutes or until golden brown and when gently touched it feels firm.
8.         Turn onto a wire tray to cool.

Orange Filling - Method
Beat all the ingredients together until smooth and creamy.

Glace Icing - Method
1.          Make the icing by adding enough orange juice to the icing sugar to make a spreadable icing. If using the orange colouring, add at this point.
2.         When cakes are cold, spread the filling on one side, then, sandwich the layers together. 3.     Spread icing over the top and sides of cake.
4.         Decorate the top with Easter cake decorations.

For the finishing touch, serve and enjoy with a scoop of Vanilla Ice-cream.

Saturday, March 31, 2012

BBQ Whole Chicken


With the unexpected hot March weather, we jumped at the opportunity to whip out the BBQ for a lazy Sunday evening. BBQs for our family always is an insane meat fest with steaks, sausages, burgers and ribs. Nothing wrong with that at all, in fact some would say the 'meat sweats' are an obligatory part of the BBQ ritual. I wanted to do something a little different for this BBQ, something less intense than steaks and burgers. So I decided to cook chicken, not just chicken wings, or drumsticks, but a whole chicken!!! Its way more economically friendly to buy a whole chicken that to buy prepacked chicken pieces. It's also tastier to cook a chicken whole. 


The Prep
I never jointed a chicken before, I just rested on my laurels and it kinda paid off. What I did is I got a good pair of sharp kitchen scissors,and thats all I used. I prepared my marinades, Paprika & Honey and Garlicy Lemon, & Thyme (recipes below). These are my two favourite marinades for a roast chicken and they will work perfectly for BBQ Chicken.


Once the marinades were prepped, I set about flattening out my chicken so he can rest comfortably on the BBQ grill. What I did was I placed the chicken in front of me, breast side up and with the scissors I cut down the centre of the two breasts. Once I had cut the whole length of the chicken, I turned the chicken over and leaned down on it with my own weight (the poor chicken !!) and snapped some bones to get him nice and flat.
One little trick I did with the chicken before I cut him down the middle is I gently slide my fingers under the skin, to separate the skin from the meat. This, for some reason, really crisps up the skin.


I seasoned the chicken well with salt and pepper, skin side and under side. I then massaged the chicken with the marinades, coating every inch of the chicken. Be care with the paprika marinade, that stains EVERYTHING!!! Leave the chickens to marinade for 1-2 hours and they are good to go!


The Marinades


Paprika & Honey

  • 2 tbsp of smoked paprika
  • Leaves from 2 sprigs of thyme
  • 3 tbsp of runny honey
  • Juice of 1 lemon
  • 3 tbsp of olive oil
  • 1 grated garlic clove


Garlicy Lemon & Thyme
  • 2 grated garlic cloves
  • Zest of 2 lemons
  • Juice of 2 lemons
  • leaves from 5 sprigs of thyme
  • 1 tbsp of olive oil


The Method
  1. Mix the marinade ingredients together in two separate jugs
  2. Prepare the chicken (as above) and place plates.
  3. Rub the marinades into the chickens and allow to rest for 1-2 hours
  4. Preheat the oven to 180 degrees
  5. Place the chickens on foil trays, skin side up and roast in the oven for 35 minutes.
  6. Get the BBQ nice and hot.
  7. Remove the chicken from the oven and place on the BBQ grill skin side up.
  8. Cook on the BBQ for 10-15 minutes.
  9. Remove from the BBQ tray onto the serving tray, cover with tin foil and rest for min. 15 minutes.
  10. Serve to the table whole.


Tuesday, March 27, 2012

Chicken Bruschetta Turnovers for Easy Food Magazine


I was very excited when I received an email from Easy Food Magazine asking me to be a taster for them for the May edition of the Magazine. I’m an avid reader of cooking/food magazines and I especially like to buy the Easy Food Magazine as its Irish and also it’s got easy everyday recipes that are simple to make and usually requiring ingredients that are readily available in your local supermarket.

I thought testing the recipe would be a bit of craic and a little bit of weekend fun and I used my unassuming family as my guinea pigs. Caroline in Easy Food asked me to just write a couple of lines about myself and what I thought of the recipe. They provided the photos for the magazine themselves, so the photos of the recipe in this post are from my own kitchen/camera. If you are a reader of Easy Food magazine, like testing new recipes and get a kick outta seeing yourself in print then I suggest simply email edito@easyfood.ie to let them know your interested.


The recipe I was asked to test was Chicken Bruschetta Turnovers. These are like little pastry pies using leftover chicken. I love any recipe that involves leftovers as I hate throwing food out and food wastage so these turnovers are right up my street. They aren’t on my Monday – Friday dietery plan, but are on the Weekend Treat list. I am a big anti-pasti fan, so I thought I might make a few substitutions of my own to give the turnovers a stronger Italian flavour, i.e. substituting tomatoes for sundried tomatoes and including some pesto also. The original recipe called for 500g of leftover chicken; however I struggled to fit all that chicken into the turnovers, so I was delighted when Easy Food took on board my suggestion to half the quantity for the published version of the recipe. I used Just-Rol ready-made Puff pastry. In hindsight I think I would have rolled the pastry out to stretch it as far as it could get, and with a ruler cut out a perfect square to make the turnovers easier to seal, my bad!!......... Oh well, definitely next time…
In my suggestion to Easy Food I also noted that you could make mini versions of these turnovers for canapés for a drinks party, and they used this in the ‘Tip’ part of the recipe.

The recipe below is how I made them myself, so it varies a little from the Easy Food recipe. (It’s easy to see why now I’ll never make a precise Baker, if I can’t stick to simple recipes!!! I’m always throwing in a bit of this and a dash of that. This for me is half the fun!!!!!)However the principal is the same, just a few little personalised twists in my version, fuelled by the control freak in me and my passion for pesto!!!


Chicken Bruschetta Turnovers
Serves 8

Ingredients

·         250g leftover chicken, pulled or cut into bite-sized pieces
·         3 sundried tomatoes, chopped and blotched with kitchen paper to soak up excess oil
·         ½ onion, chopped
·         2 tbsp of basil pesto
·         A small handful of fresh basil, chopped
·         1 tsp extra-virgin olive oil
·         Salt and black pepper
·         2 sheets frozen puff pastry, thawed
·         1 egg, beaten with 1 tbsp of water
·         50g Parmesan, grated
·         50g Mozzarella, shredded

Method

1        Preheat the oven to 200°C/180°C fan/gas mark 6 and line two baking trays with parchment paper.
2        Combine the sundried tomatoes, onion, basil and oil in a bowl and season with salt and pepper.
3        Unfold the puff pastry, roll out to expand the pastry by a further 10-20% and using a ruler make a perfect square out of each sheet. This will involve cutting off a strip of pastry on the side.
4        Cut each sheet into four even squares.
5        Brush the outer edge of each square with the egg mixture.


6        Add a tsp of pesto to the centre of each square.
7        Divide the chicken evenly and place a portion in the center of each pastry square, sitting on the pesto.
8        Top with one tablespoon each of the tomato mixture, Parmesan and mozzarella.
9        Fold the pastry over diagonally, making a triangle, and press the edges well to seal. Brush the top of each pastry with the egg mixture and cook for 20-25 minutes or until golden brown and bubbling at the edges.

Everyone loved this recipe, even my cheese-hating husband. It has winner written all over it. For a simple bistro-style lunch with a green salad, or mini versions for a drinks party, or even a cold picnic companion. There is just no excuse not to try this!!!!


To make this vegetarian, may I suggest replacing the chicken with chopped marinated grilled Mediterranean veggies, e.g. Aubergines, courgettes and peppers, and use vegetarian friendly pesto and cheese.

If you like this recipe and have any interest in seeing more of these type of recipes, along with foodie cooking tips and news, log ontohttp://www.easyfood.ie/ and check out the monthly magazine, May edition, on the shelves now!!!


Saturday, March 24, 2012

Tomato & Mushoom Mhung Dhal


This low fat, high protein meal is Indian inspired. The Mhung Dhal is a type of lentil used for curries in India. I do not know how to use it authentically, but here’s a low fat tasty method of cooking it, Serena-Style, high on spicy flavour and low on calories. It truly is a life saver when caught in the ‘same food cycle’ when trying to diet mid-week. You just simply get sick of the same ole dinners day-in, day-out.


This Dhal will literally put the spice back into the mid-week diet. I’ve made double to have for lunch the following day. In India they normally have their dhal with rice, but I’m going to try to keep those proteins high by having this Dhal with some grilled spicy chicken breast.  I know that some goes against a lot of the Indian vegetarian cooking rules, but I do not claim to be cooking an authentic indian meal, simply using inspiration from the healthier parts of the Indian cuisine to make low fat dieting more interesting for me. I’ve sourced the mhung dhal from the health food store, but this recipe can easily be used using yellow spilt peas or red lentils.

 
Ingredients
·         100g of mhung dhal lentils or yellow/red lentils
·         1 tbsp of grapeseed oil
·         1 clove of garlic, chopped
·         1 inch piece of ginger, peeled and chopped
·         1 onion, sliced
·         1 red chilli, deseeded and chopped
·         1 tsp of ground cumin
·         1 tsp of ground coriander
·         1 tsp of turmeric
·         Salt and pepper
·         300ml chicken/vegetable stock
·         8 mushrooms, sliced
·         1 red pepper, sliced
·         4 tomatoes, quartered
·         3 tbsp of chopped coriander

Method

1.       Get a saucepan of stock on the boil and add the lentils and cook according to packet instructions (average 15 minutes)
2.       In a frying pan, add the oil, garlic, ginger, chilli and onion.
3.       Add the spices and fry for a few minutes.
4.       Add the mushrooms, pepper and tomatoes and fry well, then put to the side until the lentils are cooked.
5.       Drain the lentils well, add them to the frying pan and put back on the heat.
6.       Mix in well and add salt and pepper.
7.       Use a potato masher to crush a bit of the lentils, and then stir in the chopped herbs.
8.       Serve with basmati rice, or (a grilled chicken breast like me!).


(Saag Aloo [Potato & spinach] is another Indian meal in need of a low fat makeover, that would be an ideal accompaniement to the above Dhal!)


Tuesday, March 20, 2012

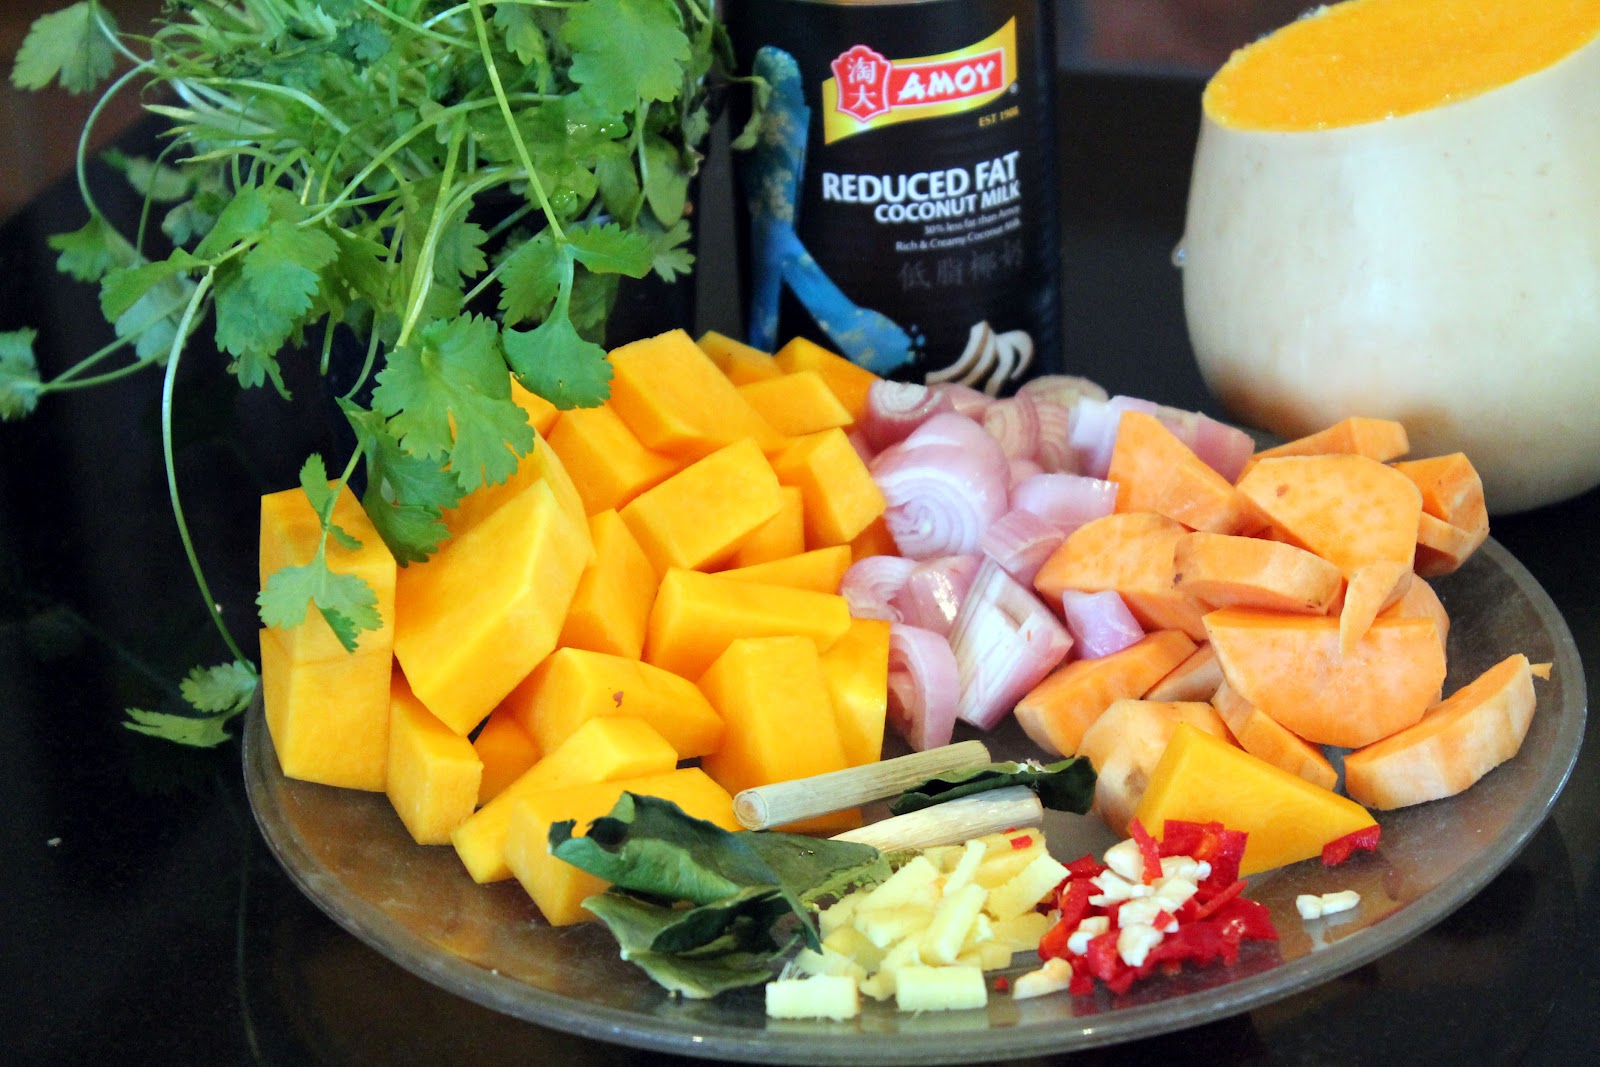
Low Fat Thai Squash & Sweet Potato Soup


Making this soup, is one of the nicest things to cook to awaken the senses. The smell of the Thai flavours mingling together in the pot, brings me straight back to the streets of Bangkok. I only wish that I could share smells with you as well as visual and written parts of this blog as the recipe is a truly fantastic example of how smells of food evoke such wonderful feeling of wellness.The sweetness of the squash and sweet potato contrast so well with the smell of shallots, ginger, lemongrass and lime leaves. It all just works!!!
I went for a Thai massage yesterday with my sister in law in Killarney (me???, spoilt??, yea!) and for 1-2 hours was transported to Thailand. The incense and the ginger tea, the welcoming gentleness of the Thai therapists, just made me want to cook something to bring us back to those five weeks we backpacked around Thailand years ago.

This soup, although has some coconut milk, it is reduced fat milk and I only use 200mls. Simply just to give the hint of coconut. The rest of the ingredients for the soup are very healthy, in fact the natural medicinal healing properties of all the ingredients on their own, make this an incredible wellness soup, especially if you have been suffering from a recent flu or cold. According to your own liking, you may wish for a heat that's more intense, if so add a full red chilli. Be warned though, the heat intensifies over night, so if you are planning to have this soup over a few days, it very well might blow your head off on day three. Another addition to this soup, perhaps for a dinner party, might be to add some raw prawns and gently heat in the soup until cooked.


Serves 6-8 bowls of soup. Can be kept for up to 3 days refrigerated.

Ingredients


  • 1/2 a butternut squash, peeled and cubed
  • 1 regular sweet potato, peeled and cubed
  • 1 garlic clove, diced
  • 1/2 red chilli, deseeded and diced
  • 1 inch piece of ginger, peeled and diced
  • 4 kaffir lime leaves
  • 1 lemongrass stick
  • 2 shallots
  • 700ml of chicken stock
  • 200ml of reduced fat coconut milk
  • 2 tsp of fish sauce
  • Juice from one lime
  • 4 tbsp of fresh coriander
  • 1 tbsp of vegetable oil.


Method

  1. Fry the shallot, ginger, chilli, garlic in the pan with the oil.
  2. Add the squash, potato, lime leaves, lemon grass and stir for a few minutes.
  3. Add the chicken stock and fish sauce and bring to the boil.
  4. Simmer for 15 minutes.
  5. Blitz the soup smooth with a hand held blender
  6. Add the coconut milk.
  7. Stir through with the fresh coriander and lime juice.
Related Posts Plugin for WordPress, Blogger...