Showing posts with label Snacks. Show all posts

Tuesday, February 28, 2017

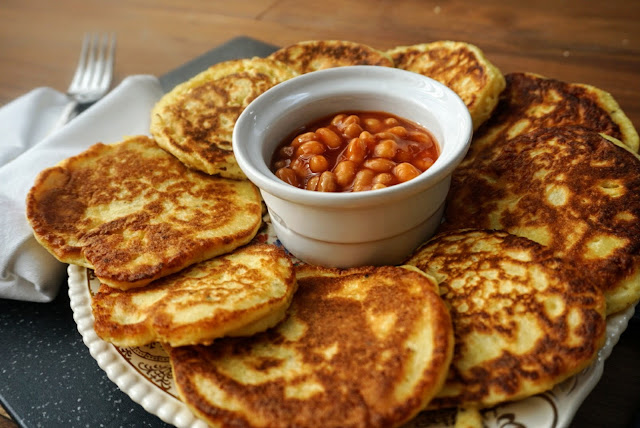
Irish Potato Pancakes - Pimped up Leftovers for a happy Pancake Tuesday


I have gotten into the habit of deliberately making too much mash potatoes for the dinner, so I can have an excuse to make these delicious potato pancakes. The kids love them, as does my husband.


Today is pancake Tuesday, but rather than making my usual batter (which I make a couple times a week anyway off season) I decided to make these potato pancakes. I make them with the kids in mind, so I always make a plain batch. However if I was thinking about adults I would certainly spruce them up with scallions and herbs, and maybe ever some feta.  There really are loads of possibilities and variations so feel free to experiment for more grown up tastes.


Ingredients


  • 325g cold mashed potatoes
  • 1 tsp baking powder
  • 110g self raising flour
  • Salt/pepper
  • 180ml milk (today I used soy milk)
  • 2 eggs
  • Oil for frying


Method


  1. In a bowl add all the ingredients except for the oil
  2. Whisk until very well combined, I used a hand held whisk
  3. Put a pan on a medium heat, add the oil, I used olive
  4. Using a ladle, pour in the batter in ladle size batches. 
  5. Allow to fry until bubble holes appear on the top. This takes approx 2-3 minutes.
  6. Flip the pancakes, and fry for another 2 minutes.
  7. I got 15 small-medium size pancakes from this mixture and served with baked beans for the kids lunch. The wolfed them.


Tip: A sophisticated starter/brunch idea, would be to add chopped dill to the batter and serve the pancakes with smoked salmon and creme fraiche.

Thursday, February 23, 2017

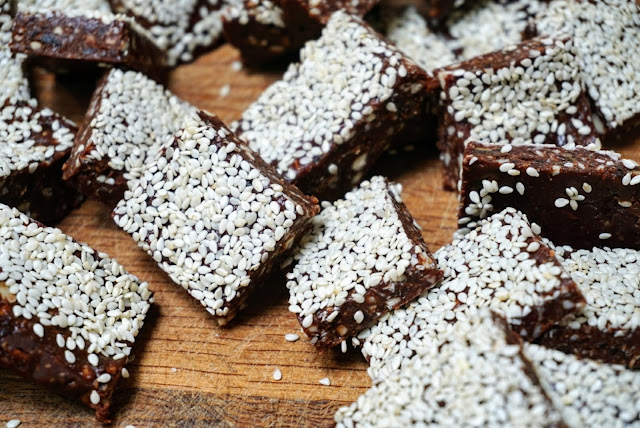
"Chocolate" Energy Bars


These energy bars are a variation on my Nut Free Energy Balls. Their very health ingredients help give a slow release of energy along with a tasty chocolatey hit. I've research Maca powder lately after seeing it in my local Aldi supermarket. Apparently it has a positive effect on our hormone levels, it's an energy booster, along with being very rich in nutrients. It's high in vitamin B, C, & E; and it has a higher level of calcium than milk.  I think I'm onto a new favorite in my health food cupboard, along with my raw cocoa powder and chia seeds.


I highly recommend making these, they are delicious and the kids love them. Perhaps too good as I've snuck to the freezer at least for four times today for a sneeky bite.


Ingredients

  • 9oz pitted dates
  • 4 oz raw almonds
  • 2 tbsp of coconut oil
  • 2 tbsp of maple syrup
  • 1 tbsp of maca powder
  • 1 tbsp of  raw cocoa powder
  • 1  tsp of salt
  • 2 tbsp of desiccated coconut 
  • 1-2 tbsp of sesame seeds


Method


  1. Pulse the almonds in a food processor until they are broken down.
  2. Add the remaining ingredients and blender until the mixture forms a large dough ball.
  3. Turn out the ball onto a swiss roll tin lined with baking paper, and flatten out into a thin even layer.
  4. Scatter with the sesame seeds and transfer to the freezer for 30 minutes to firm up.
  5. Cut into squares and store either in the freezer or the fridge. (I like them hard and chewy out of the freezer).


Monday, July 4, 2016

Chocolate Caramel Bites - Speedy Sweet Canapes


This post isn't even a recipe, I couldn't call it that, as these bites are just a simple assembly job. In saying that they taste amazing, too good not to share! I love to have something nice and sweet greeting all my guests arriving to the Bed and Breakfast. Sometimes I have time for cupcakes or brownies,  but there are some busy days when I don't have enough time for anything other that pimping up melted chocolate!

For these little bites from heaven, I use all butter shortcrust pastry case from Marks and Spencers. I have made these from scratch before using shortcrust pastry, but these shop bought ones are great, especially if you are on a time budget

A staple in everyone's pantry should be Nestle's Carnations Caramel Sauce, it's awesome! So good in so many treats.

The final ingredients were some dark chocolate and some candy sprinkles. Here's the assembly recipe!


Ingredients

  • 1 can of Carnation Caramel
  • 1 100g bar of good dark chocolate 
  • Sprinkles
  • Ready made mini  all butter shortcrust pastry cases


Method


  1. Melt the chocolate in the microwave in 30 second bursts
  2. Place 1/2 tsp of carnation caramel in each pastry case
  3. Pour 1/2 tsp of melted chocolate over the caramel and place your sprinkle of choice on the melted chocolate.
  4. Put in the fridge for 20 minutes and they are ready to eat.


Perfect for a tea party, last minute guests, or a canape for a drinks party. I myself put them on a table in the hallway of my Bed and Breakfast, so chocolate is the first thing that my guests see when they walk through the door.


Sunday, June 12, 2016

Red Quinoa & Smoked Salmon Sushi - A Low GI Alternative to Sushi Rolls


Nori Maki is my favorite sushi!! I adore the taste of the nori seaweed paper and the sweet and tangy rice vinegar soaked sticky sushi rice! I've been hooked ever since my Sushi for Beginners class in Ballymaloe (see previous blog post here). I've been obsessed lately with trying to eat foods with a low GI, and trying to pair the correct foods together. I was shocked to see sushi rice so high on the glycemic index (89). Not one to say good bye to my beloved nori maki rolls, I set about trying to find an alternative for the high GI rice. After all, every other part of the rolls are extremely healthy.


That's when I discovered that the awesome quinoa could do the same job as the rice. I have developed quite an obsession for red quinoa, I love the crunchier texture over white quinoa, but they both still have the same nutrient make up more or less. I'll admit that white quinoa is fluffier and probably be easier to work with from a 'sticky' perspective, but I think that the red quinoa just has more flavor, dammit!! :)


There is something so satisfying about rolling nori maki rolls. I can't put my finger on it, it's reminds me of make and do as a child and has a fun playful aspect to it. It's actually childsplay to make and you'll find that you become more confident and accomplished as you progress from rolling your first roll to the final one.


I have an endless supply of gorgeous fresh smoked salmon in my kitchen from the Bed and Breakfast so I robbed some for my dinner to make these rolls. We get our salmon delivered to the door from a local supplier and it's definately worth buying your smoked salmon locally. There is no comparison with the cheaper supermarket alternatives. If you don't like/have smoked salmon you can use pretty much anything, prawns, crab, or go completely veggie, and have a rainbow of peppers and cucumbers. There are no rules!! Afterall, I'm not even using rice!


I will say you can't have sushi without wasabi, pickled ginger or soy! Now that's a deal breaker! I love the hot hit you get from wasabi, so I spread it on my salmon in the roll, but if you're not that hard core, just plant a blob of it on the side of your plate and dip in the roll after. The 'hot hit' though is an addictive feeling.

Here's the recipe to my favorite, but use this as a guide and substitute in the ingredients you like


Makes 4 Rolls

Ingredients


  • 1 cup of red quinoa
  • 2 cups of water
  • 4 tbsp japanese rice vinegar
  • 1 tbsp of salt
  • 2 tsp of sugar
  • 4 nori sheets, try to source a sushi rolling bamboo mat also. They are usually sold along side the nori sheets. It makes rolling so much easier.
  • 50g of smoked salmon, sliced thinly
  • Thinly sliced variety of peppers, carrots, and cucumber
  • 1 tube of wasabi
  • soy sauce
  • pickled ginger


Method


  1. Firstly you must cook you quinoa. Add 2 cups of water to a saucepan, bring to a boil, add the the quinoa and cook on a simmer for 15 minutes.
  2. Drain well.
  3. Spread the quinoa out in a dish and mix in the vinegar, salt and sugar and make sure everything gets well coated.
  4. Allow the quinoa to cool.
  5. Get your bamboo rolling mat and place in front of you.
  6. Wave a sheet of nori over the hob, careful not to burn, but just to heat slightly to make the sheet more pliable.
  7. Place the nori sheet on the bamboo mat, shiny side down.
  8. Spread a thin layer of quinoa over the the whole sheet, out to the edges, leaving a small space at the top side of the sheet to seal it. 
  9. Lay the smoked salmon and the vegetables (whichever combination you prefer) on the side nearest you. Careful not to over fill as the roll will burst if over filled. I know this from vast greedy experience.
  10. Dab the empty edge of the nori sheet with rice vinegar using your finger. This is your glue.
  11. Carefully , as tight as you can, start rolling the the roll, away from you.
  12. I like to cut the ends of the sushi rolls normally for a cleaner finish, and these ends are cooks treat.
  13. Cut the roll in half, and then cut those halves in half, and finally , cut those pieces in half. You should have eight pieces, for small bites. you can make them bigger, but the sushi etiquette is to be able to eat your roll in one mouth full, and I don't know about you, but my mouth isn't big enough for anything bigger than 1/8 of a roll at a time.


To serve, put a 'blob' of wasabi on the side of the plate, soy sauce in a dish and pickled ginger on the side. Dip and enjoy.

Tuesday, May 10, 2016

Spicy Harrisa Chickpea Cakes with Chunky Raita


Here's a super quick, super healthy vegetarian dish perfect if you are stuck in a lunch time rut, like myself! The harrisa paste gives the chickpea cakes a real hot and smoky kick, with the raita being the perfect cooling accompaniment. This can easily be made ahead of time and reheated in the microwave and added to the raita salad, if you are office based. But equally this dish is a perfect starter for a dinner party or also throw the cakes in a pitta or flatbread for a wonderful alternative to a sandwich. Whatever the occasion, there is no excuse not to give these babies a go!!


Ingredients

  • 1 tin of chickpeas, drained
  • 1 garlic clove, minced
  • 3 tbsp of chopped fresh flat leaf parsley
  • 1 tsp of harrisa paste
  • Salt & Pepper
  • 1 egg
  • 2 slices of bread, blitz to breadcrumbs


Raita

  • 50ml of natural yogurt
  • 1 tomato, deseeded and diced
  • 1/4 cucumber, peeled, deseeded and diced
  • Salt and pepper
  • 2 tbsp of chopped fresh flat leaf parsley
  • 5ml extra virgin olive oil
  • 3 tbsp diced red onion


Method

  1. Add all the chickpea cake ingredients to a food processor and blitz to a batter style consistency.
  2. Wet your hands and shape into small patties (cakes). I got 10 from this recipe, but you can make them smaller for canapes or bigger for burgers.
  3. Heat a non stick pan to medium and add a small amount of olive oil.
  4. Fry the chickpea cakes for 4 minutes on each side.
  5. To make the chunky raita, simply combine all the ingredients and stir well. If you have mint or coriander, this would also work.
  6. Enjoy. These can be stored cooled for 2 days in the refrigerator and reheated gently on a pan for for 1 minute in the microwave.


Thursday, February 11, 2016

Roast Squash & Goats Cheese Quinoa Pizza - A Pizza Not Just for Weekends


Big big fan of pizza,who isn't?, well except my daughter (THE fussiest toddler on the planet) But it's usually keep for weekends as I'm thinking of the fat, calories and carbs!!! But then the other day I was reading my new Donna Hay book, Fresh and Light, where a quinoa crust tart was featured, so I got to googling quinoa pizza. I was thinking, if a tart base can be made from quinoa, then surely a pizza base can be fashioned in relatively the same manner.


I stumbled across a website called Simply Quinoa, and I was blown away by the variety of recipes on the website, all of which contain quinoa. If you are a fan of quinoa or looking for some ideas to replace your carbs with quinoa, then I suggest you check out the website. I'm highly impressed!!!


It's from Simply Quinoa that I got the recipe for my pizza base. I did use red quinoa (though apparently white quinoa is better), as this was all I had in the house at the time, but it worked out brillantly. I've used gluten free pizza bases in the past, and most are disgusting. I was very skeptical of the result in using quinoa would have on the finished product, but I needn't have worried. I kept saying to my husband 'wow,wow, I can't believe it' as I was eating the pizza. What's more,Alan (fearer of all that is alternative and healthy) agreed it was pretty tasty.


So here is the recipe as taken from Simply Quinoa for the basic base Simply Quinoa's Ultimate-quinoa-pizza-crust/

Serves 2 (or Serena)

Ingredients

For the Pizza crust

  • 3/4 cup of quinoa, soaked for 6-8 hours
  • 1/4 cup of water
  • 1/2 tsp baking powder
  • 1/2 tsp of salt
  • 2 tbsp olive oil


For the pizza topping

  • 1 tbsp of passata
  • Roasted cubes of butternut squash
  • 50g soft goats cheese
  • 1 tbsp grated mozzarella
  •  1/2 tsp dried oregano
  • 1/2 tsp  black pepper
  • Pinch of dried chilli flakes
  • 1 tsp chopped flat leaf parsley


Method

  1. Preheat the oven to 220 degrees and lay oiled baking paper on a baking tray.
  2. Rinse the quinoa and put in a blender along with the other ingredients. I used my Nutri Ninja, making it the work of mere moments. The mixture is like a pancake batter.
  3. Pour the batter out onto the baking paper trying to keep a circle shape.
  4. Bake for 15 minutes, then turn it over and bake for a further 15 minutes.
  5. Spread the tomato sauce over the base and scatter the toppings over the sauce. Bake in the oven for 12-15 minutes, until the pizza is ready. Then enjoy.
You can use any ingredients once your pizza base is made, everyone has their one favorite pizza toppings. 

I'm even thinking that this crust would also work as well sweet as it does savory, so watch out for my quinoa apple tart or a nutella smore pizza!!!!


Saturday, July 11, 2015

Lemon Curd & Blueberry Tarts - The Fastest Tarts in the West


I had to think twice whether or not to post this recipe as it's nearly too easy, and hardly a recipe at all. But then I thought why not show how a bit of quick thinking can help transform just 3 ingredients into something truly scrumptious.

Shop bought ready rolled puff pastry is an absolute godsend! The possibilities for baking recipes are endless. Here I'm using my own homemade lemon curd, but you can just as easy buy a good quality jar of lemon curd.


 The lemon and blueberry flavours are a match made in heaven, but you could always subsitute the blueberries for raspberries if you wish.


I made these tarts this morning for my Bed and Breakfast guests. I'm usually up against the clock in the morning preparing the breakfast, but as these tarts require minimum effort, they were the perfect choice for early morning baking!

Ingredients


  • 1 sheet of ready rolled puff pastry
  • 12 tsp of lemon curd
  • 24 blueberries


Method

  1. Preheat the oven to 180 degrees.
  2. Line a baking sheet with baking paper.
  3. Stamp out 12 circles of pastry rounds
  4. Place 1 tsp of lemon curd in each pastry disc, followed by 2 blueberries.
  5. Pinch up the sides of the circle, so the lemon curd doesn't escape.
  6. Spread the discs out of the baking sheet and bake in the oven for 14-15 minutes.
  7. Allow to cool completely on a wire rack when baked.


Saturday, June 6, 2015

Fried Aubergine & Killarney Honey - A Spanish Tapa Killarney Style


I was chatting with a good friend of mine the other day about going on holidays and I was recommending the lovely resort town of Costa Teguise in Lanzarote as an option for her to go now that she has a young family. I went there 3 times in 12 months recently! The food there is amazing!! It is here that I discovered the Spanish tapa of fried aubergine with honey. I feel in love with it. Even my husband who is 'afraid' of every type of vegetable couldn't say no to these tasty morsels.


As I was reminiscing about all the wonderful meals we had in that resort, I remembered those gorgeous bite size aubergine slices and all of a sudden I got a mad craving for them. So instead of my usual salad for lunch, I decided to change things up today and make the fried aubergines.


We are incredibly lucky here in Killarney that  there are amazing honey producers close by - Killarney Honey. However, any really good honey will suffice to sweeten up these deliciosus treats.


Ingredients

  • 1 aubergine, peeled and sliced into round discs
  • Sea salt
  • Table salt
  • 1-2 tbsp of flour
  • Good runny honey
  • Good quality  balsamic syrup
  • 5-6 tbsp of rapeseed oil (or other flavourless oil)


Method
  1. Place the aubergine slices in a plate and sprinkle with the table salt and leave for 10 minutes.
  2. Using kitchen paper, press down on the slices to release and remove all the water that seeps from the slices.
  3. Put the oil on a high heat.
  4. Place the flour on a plate and dip each slice of abergine into the flour, making sure they are completely coated. Shake off the excess flour.
  5. Carefully place each disc of aubergine in the hot oil, and cook for 2 minutes, before turning and cooking for a further 2 minutes, or until golden brown.
  6. Remove the slices from the oil and place on kitchen paper to allow the excess oil to drain away.
  7. Place the disc of aubergine on a plate and drizzle generously with your honey, sprinkle with coarse sea salt and finally drizzle for balsamic syrup over the aubergine.

Tuesday, May 5, 2015

Pistachio & White Chocolate Spread - The Indulgent Nutella Alternative


I first came across this spread whilst on holidays in Sicily. I mentioned before how we stayed in a Farmhouse B&B on our last night in Sicily. They made their own olive oil as well as growning pistachios. (http://www.ciucismanor.it/php/products.php). The breakfast was a real homely experience with everyone gathered around one big table with all the delicious baking and meats and spreads in the centre of the table, everyone helping themselves. I  must have eaten a whole bowl of the pistachio spread before asking our host, Ginevra, what exactly is was that I was eating. I thought to myself no wondering it tastes amazing.............Chocolate........White Chocolate!!!!


 When Ginevra explained that it was a type of chocolate spread made with pistachios and white chocolate, I was hooked. It tasted unreal and the vibrant green colour gives it a fantastic appearance.


My own tried and tested spread is simple to make, but I've found, very difficult to eat only a small portion at a time. I use coconut oil here, but you could use other oils,  like sunflower oil or groundnut oil.


Ingredients

  • 300g of shelled pistachios
  • 200g of good quality qhite chocolate
  • 4 tbsp of coconut oil
  • 1 tsp of vanilla extract
  • 1 tsp of table salt


Method

  1. Place the pistachios in a food processor and blitz until a wet crumb forms, could take up to 3 minutes.
  2. Melt the white chocolate in a glass bowl over a pan of simmering water. Add the vanilla extract to the melted chocolate.
  3. Allow the chocolate to cool.
  4. Add the coconut oil, salt and melted chocolate to the pistachio crumb and blitz it again until to clumps together and ressembles a butter.
  5. Store in an airtight container, in a cool dry place. (Not the fridge, otherwise it will loose it's spreadability).
  6. It's delicious on toast, crusty bread, or on cupcakes, or as an alternative to cream in a victoria sponge perhaps.

Related Posts Plugin for WordPress, Blogger...