Tuesday, March 20, 2012

Low Fat Thai Squash & Sweet Potato Soup


Making this soup, is one of the nicest things to cook to awaken the senses. The smell of the Thai flavours mingling together in the pot, brings me straight back to the streets of Bangkok. I only wish that I could share smells with you as well as visual and written parts of this blog as the recipe is a truly fantastic example of how smells of food evoke such wonderful feeling of wellness.The sweetness of the squash and sweet potato contrast so well with the smell of shallots, ginger, lemongrass and lime leaves. It all just works!!!
I went for a Thai massage yesterday with my sister in law in Killarney (me???, spoilt??, yea!) and for 1-2 hours was transported to Thailand. The incense and the ginger tea, the welcoming gentleness of the Thai therapists, just made me want to cook something to bring us back to those five weeks we backpacked around Thailand years ago.

This soup, although has some coconut milk, it is reduced fat milk and I only use 200mls. Simply just to give the hint of coconut. The rest of the ingredients for the soup are very healthy, in fact the natural medicinal healing properties of all the ingredients on their own, make this an incredible wellness soup, especially if you have been suffering from a recent flu or cold. According to your own liking, you may wish for a heat that's more intense, if so add a full red chilli. Be warned though, the heat intensifies over night, so if you are planning to have this soup over a few days, it very well might blow your head off on day three. Another addition to this soup, perhaps for a dinner party, might be to add some raw prawns and gently heat in the soup until cooked.


Serves 6-8 bowls of soup. Can be kept for up to 3 days refrigerated.

Ingredients


  • 1/2 a butternut squash, peeled and cubed
  • 1 regular sweet potato, peeled and cubed
  • 1 garlic clove, diced
  • 1/2 red chilli, deseeded and diced
  • 1 inch piece of ginger, peeled and diced
  • 4 kaffir lime leaves
  • 1 lemongrass stick
  • 2 shallots
  • 700ml of chicken stock
  • 200ml of reduced fat coconut milk
  • 2 tsp of fish sauce
  • Juice from one lime
  • 4 tbsp of fresh coriander
  • 1 tbsp of vegetable oil.


Method

  1. Fry the shallot, ginger, chilli, garlic in the pan with the oil.
  2. Add the squash, potato, lime leaves, lemon grass and stir for a few minutes.
  3. Add the chicken stock and fish sauce and bring to the boil.
  4. Simmer for 15 minutes.
  5. Blitz the soup smooth with a hand held blender
  6. Add the coconut milk.
  7. Stir through with the fresh coriander and lime juice.

Friday, March 16, 2012

Irish Lamb Stew


My Traditional Irish Stew certainly wouldn’t win any beauty competitions, but it’s a delicious flavourful one pot wonder, so I make it time and time again.

When we were young, you were guaranteed Irish Stew for dinner at least once a week (along with bacon & cabbage), though with the introduction of foreign cuisines into our diets we have these traditional Irish meals less frequently now.

There are umpteen recipes out there for Irish stew, but this is a simple stew, leaving the meat on the bone for extra flavour.  Irish stew traditionally is made from lamb or mutton, boiled with potatoes, carrots, celery, and onions. Though these days you can make any stew with these ingredients or similar and call it Irish Stew. A particular popular Irish Stew is Beef & Guinness, though I think this is more of a casserole. 

Everyone’s interpretation is different and usually it stems from ‘how mammy used to make it’, and I sure as hell amn’t going to knock any! I actually like tasting different variations of Irish Stews, I think the difference might stem from region to region, though that’s just an idle theory, that I have no basis for funnily enough, just a ‘thinking out loud’ ramble!!!! Anyways…..moving on to ‘how my mammy made it’…


In honour of St Patrick’s Day this year, I thought I’d revisit my mom’s recipe for a lamb stew and share it round. (The secret ingredient here is the Worchestshire sauce).

Serves 2

Ingredients
 
·         4 Lamb chops on the bone
·         4 peeled rooster potatoes, quartered
·         3 carrots, peeled and chopped into thirds
·         2 onions, quartered
·         2 bay leaves
·         4 sprigs of thyme
·         500ml of chicken stock
·         7-8 mushrooms, halved
·         3 tbsp of Worcestershire sauce
·         Salt and pepper

Method
1.       Preheat oven to 180 degrees.
2.       Get an oven proof casserole dish on a medium heat.
3.       Brown the chops on either side.
4.       Removed from the pan and add the onions, carrots, potatoes, bay leaves, thyme, and mushrooms. Sauté for 3-4 minutes.
5.       Return the chops to the pan and cover with the chicken stock and add salt and pepper. Add the Worcestershire sauce.
6.       Bring to the boil, cover with a lid and place in the oven for 1 ½ - 2 hours. (alternatively, turn the heat on the hob down to the lowest setting and simmer for 1 hour).
7.       Once completely cooled, the stew will keep for up to 2 days when stored correctly, i.e in fridge

Wednesday, March 14, 2012

The Best Irish Coffee


With Paddy’s Day rolling closer this weekend, what better way to raise your glasses and say ‘Sláinte!!’ than with an indulgent Irish Coffee!!!


This is a tried and tested plain and simple recipe for the best way to prepare an Irish Coffee!

Wherever you are in the world and whatever nationality you are, I wish you a Lá Fhéile Pádraig Sona Daoibh.
I hope you will enjoy the day with family and friends and perhaps raise a glass of the black stuff!!!


Serves 2

Ingredients
·         Irish Whiskey, 2 Irish size shots
·         Cream, 100mls softly whipped
·         Brown Sugar, 2 tbsp
·         Freshly brewed strong coffee (I used Nespresso)

Method
1.       Pour the whiskey into a heat proof glass (preheated) and stir in the sugar.
2.       Top with the coffee and stir well.
3.       With the back of a spoon, pour in the cream, and sprinkle with chocolate powder.
4.       Drink with a smile on your face and heat in your belly!!!


Tuesday, March 13, 2012

Nicola's St Patrick's Day Muffins


My good friend and baker extraordinaire, Nicola, is back by popular demand here with another occasional baking recipe. Here is a great little recipe for muffins, which can be baked any time, it doesn't have to be St. Patrick's Day......its just a good excuse!!!! 

For the occasion, Nicola has made bright green buttercream frosting which adds a real fun element to the muffins, not to mention delicious, its nearly a shame to tuck in they look so good! Arra- be-garra!!!


Saint Patrick’s Day - Lá Fhéile Pádraig is a cultural and religious holiday celebrated on the 17th of March in Ireland. When the 17th March comes round every year we all get very proud of our Irish heritage, especially those of us who are living abroad and away from family. Family dinners and get-togethers will be very special for me this year as I will visit family at home. I have decided to make a few muffins for the occasion with a built in ‘green’ theme.

St Patrick’s Day Muffins

SERVES 12Muffin Ingredients
310g (lloz) plain flour
4 level teaspoons baking powder
55g (2oz) caster sugar
28g (1 oz) dessicated coconut (optional)
2 eggs
375ml (13 fl oz) milk (full fat)
160g (5 and 3/4oz) melted butter
1 teaspoon of vanilla extract

Buttercream Icing
Ingredients
140g/5oz unsalted butter. (at room tempeture)
280g/10oz icing sugar
1-2 tbsp Milk
Few drops Green food colouring
Muffins - Method
1. Preheat oven to 200 C / Gas 6. Lightly grease a 12-hole muffin tin.
2. Put paper cups into a muffin tray.
3. Get two bowls, one large one medium.
4. Put the flour baking powder, Caster Sugar and dessicoted coconut (if using) into the large bowl.
5. In another bowl, mix the eggs, milk, melted butter and vanilla extract.
6. Make a well in the middle of the dry ingredients and pour the wet ingredients into it. Mix with a wooden spoon everything together the mixture
should be lumpy, don't be tempted to over-mix it’s meant to be that way.
7. Spoon the mixture into paper cups in the muffin tray or straight into the
muffin holes Bake for 20-25 minutes or until a skewer comes out clean.

NOTE
Ovens vary so keep an eye on it near the end. They should have risen beautifully and golden. Leave to cool in the tin for a few minutes, then lift out and place on a rack.

Buttercream Icing – Method

1. Beat the butter in a large bowl until soft. Add half of the icing sugar and beat until smooth.
  1. Add the remaining icing sugar and one tablespoon of the milk and beat the mixture until creamy and smooth. Beat in the milk, if necessary, to loosen the mixture.
  2. Stir in the food colouring until well combined.
  3. Decorate with coloured sugar, smarties and other edible decorations.
Use and store the icing at room temperature because icing will set if chilled. Icing can be stored in an airtight container for up to 3 days.

Sunday, March 11, 2012

Retro Smoked Salmon Paté


For a different dinner party starter, that was quick to prepare and in advance I decided to make some smoked salmon paté. The beauty of this recipe is that it needs to be prepared in advance, so this takes the pressure off cooking a starter when you have guests to entertain.
I used half fat creme fraiche and Philadelphia Light cream cheese so the pat isn't as naughty as it could be, easing the guilt a little, and allowing you to indulge at bit.

Serves 4

Ingredients

  • 200g of smoked salmon, chopped
  • 150g of smoked salmon (for moulds)
  • Juice of half a lemon
  • Pepper
  • 2 tbsp of dill
  • 150g of light cream cheese
  • 2 tbsp of light creme fraiche
  • 2 spring onions, chopped.


Method

  1. In a food processor, add the chopped smoked salmon, the lemon juice, pepper, cream cheese and creme fraiche, onions and half the dill. Blitz for a creamy consistency.
  2. Get 4 ramekins, and cover the inside with cling film, allow the film to spill well over the edges.
  3. Place the smoked salmon in the moulds, covering the inside and allowing it to cover up over the sides.
  4. Spoon in the paté, and fold over the overhanging salmon and film.
  5. Refrigerate for at least 2 hours.
  6. When ready to serve, pull out the cling film and carefully place the contents upside down on a plate
  7. Serve with a sprinkle of the remaining dill, some toasts and lemon wedges.

Monday, March 5, 2012

Homemade Pizza’s – Simply Childsplay.


Pizza making is a great way to get small kids to get involved in cooking, its also a great idea for a casual dinner party. Once the dough is made then the rest is easy peasy. The dough can be made the night before, and even better it can be frozen in ziplock bags, meaning an authentic slice of Italy is never too far away.
Ever the calorie conscious diva that I am, I usually go in for pizzas with ‘zero point’ toppings and a ‘zero point’ homemade tomato base sauce. By adding flavour in the form of chilli and herbs then the pizza can remain low fat and still taste delicious.
I tried to be a true pizza making hero and ditched the rolling pin, in favour of the traditional way of making them with my hands stretching, and tossing and flipping in the air. My advice for this method is, unless you are a true Pro, then don’t do it, more dough will end up on the floor than in your belly. Furthermore, I didn’t get anything that resembled a round pizza. In saying that, a rustic ‘circle’ gave the pizza more homemade’loving’ feel. I do recommend rolling out the pizza until the dough is paper, nearly see-through, thin. It gives a fabulous crispy base and less dough is needed, thus fewer calories, but more pizzas.
As far as toppings go, anything goes really. I don’t like to put too much on the pizza as I find if you overcrowd it, then the base gets soggy and nobody wants a soggy bottom!!
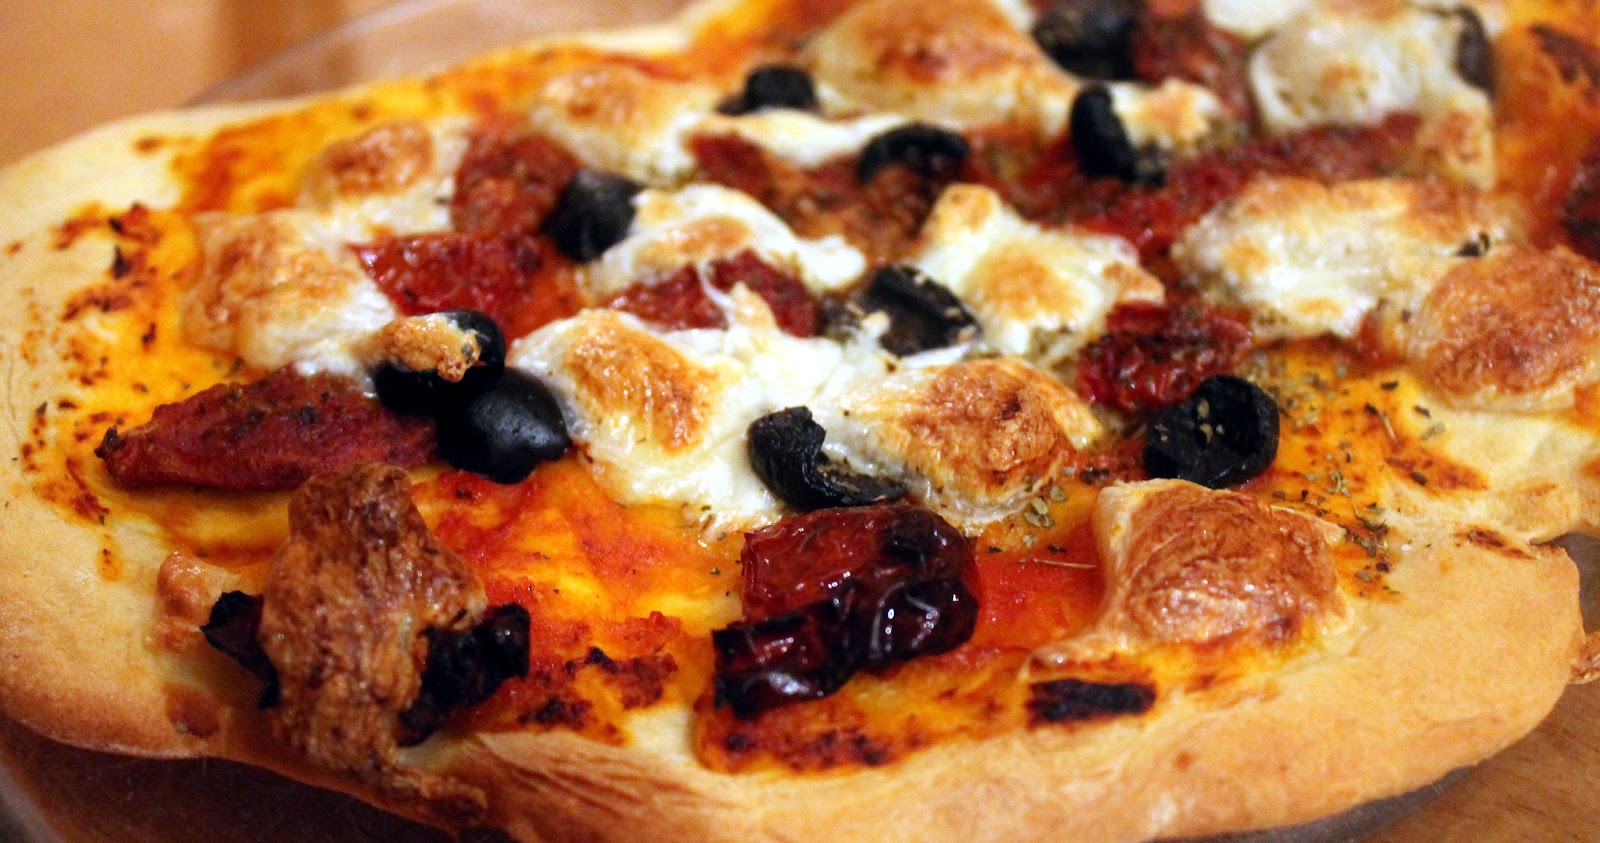
The list is endless for pizza toppings, you can add any type of meat, eggs, fish, veggies, fresh salad post cooking, and the variety of cheeses is endless. I like a traditional Italian pizza with just buffalo mozzeralla (low fat of course), olives and sundried tomatoes. Whereas my husband will go all out with a total meat feast of salamis, pepperonis, parma ham, bacon and pinapple (the pineapple makes him feel healthy).
I decided to make pizza over the weekend when I had a toddler to entertain. My beautiful niece Naoise is used to cooking and baking with her mom, so I thought it would be a great way to keep her occupied for  an hour or so.  The little munchkin came equipped with her own apron and rolling pin, meaning big business.  The making of the pizza I think, was more enjoyable for her than the eating. The smooth running of this was all in the prep. I had her own dough ready made for her, so she could play with it and roll it. I had her grated cheese and ham and pinapple pre-cut and ready to go also. She got a great kick out of it and stayed quietly eating her pizza for an hour at the table, allowing us a chilled out time for grown-up pizza and white wine! If you are having  kids over, or planning a kids birthday, then judging by the response the pizza making got from Naoise, a pizza making party should go down well. A word of warning though, be prepared, very prepared for a messy flour covered kitchen.

Serves 6 pizzas

Ingredients

Tomato sauce base

(You can use passata from a carton/jar if time is of the essence)
Alternatively:
·         Tinned of peeled tomatoes
·         1 onion finely diced
·         1 garlic clove, minced
·         ½ red chilli, deseeded and chopped (no chilli for children)
·         1 tbsp of tomato puree

Dough

·         650g 00 flour
·         7g of fast action yeast
·         25mls of olive oil
·        50mls  Milk
  ·        325ml  warm water
·         2 tsp of salt

Toppings

·         Dried Oregano
·         Chilli Oil
·         Low fat Mozzerella
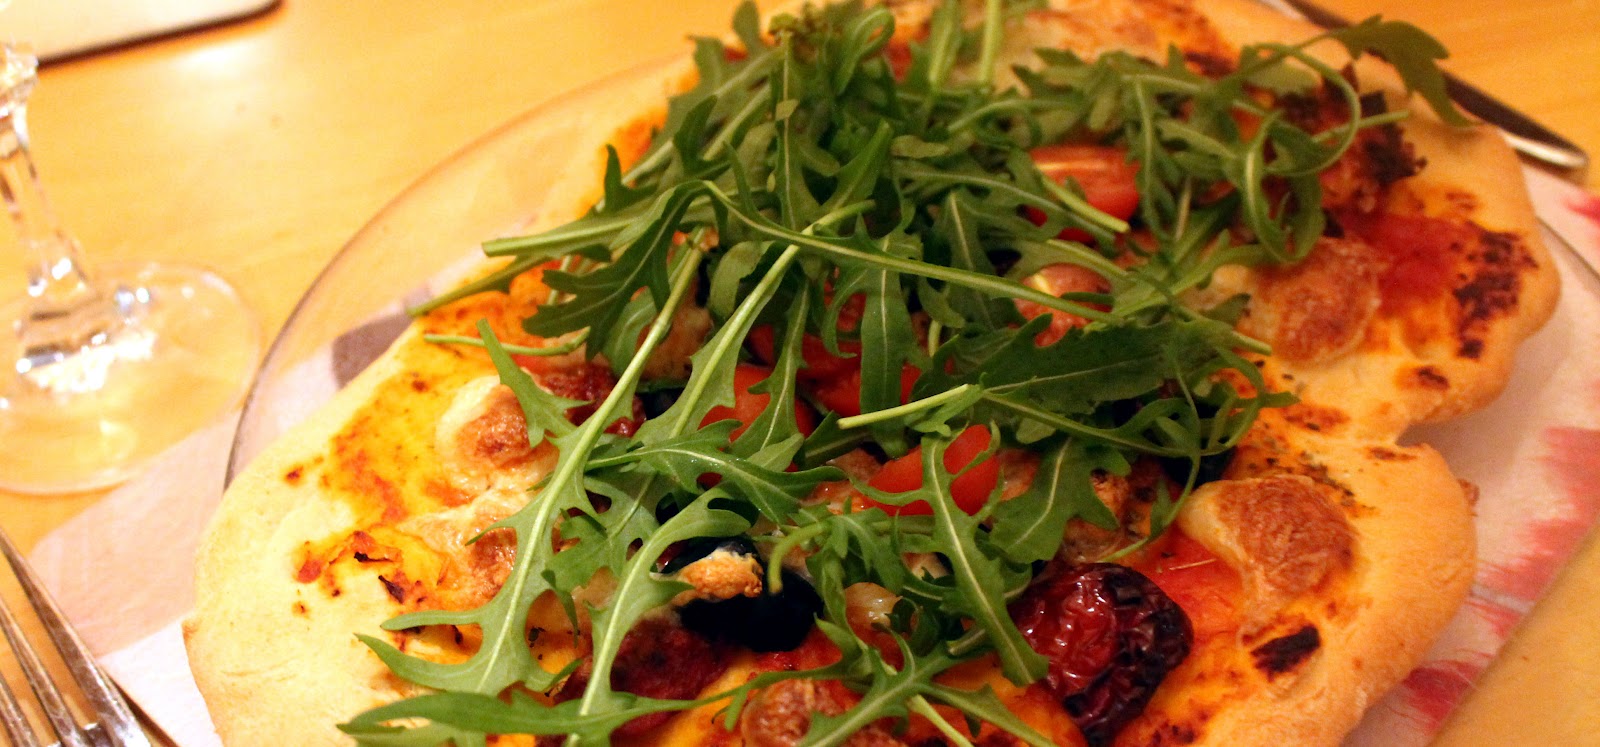
·         This is a personal choice. Feel free to use which ever you like best to create your own individual pizza. I like olives, sundried tomatoes and rocket.

Suggestions

Ham & Pineapple – what it says on the tin!
Meat Feast  -  salami, pepperoni, parma ham, bacon bits, jalapeno peppers
Veggie Heaven – courgette, peppers, mushrooms, tomatoes, sweetcorn

Method

The tomato sauce and the dough can be both premade 24 hours in advance, even frozen.

The Tomato Sauce

1.       Get a pan on the heat and sweat the onions and garlic for 5 minutes
2.       Add the remaining ingredients and simmer for 15 minutes until the sauce has reduced down considerably.

The Dough

I got the dough recipe from the BBC Good Food website, there are lots of different versions out there, this is Silvano Francos take on it, and it was simple and gave a really great crisp dough, that didn’t feel stodgy.


1.       Add the flour, salt and yeast to a bowl and mix well.
2.       Add the milk and oil and mix well, and then gradually add the water and mix to form a soft dough
3.       Dust the work surface with flour and turn the dough out onto the flour.
4.       Kneed continuously for 5-10 minutes. Once the dough isn’t sticky and is elastic, place in a clean bowl that has been rubbed with olive oil.
5.       Cover with cling film and leave for 2 hours to rise.
6.       At this stage if leaving overnight just refrigerate, and take out of fridge 2 hours before you wish to use.
7.       When ready to use the dough, flour the work surface again, and turn out the dough to the flour. Kneed again for 5 minutes to knock out the air.
8.       Shape the dough into a sausage shape and cut into equal balls.
9.       Roll the dough into rounds and place on baking paper on a tray.

The Pizza

1.       Have the oven preheated to 200 degrees.
2.       Smear the tomato sauce over the base, leaving ½ inch clear on the edges. Use only 2 tbsp of sauce per pizza (the base will have a very soggy bottom otherwise)
3.       Then top with your preferred toppings and sprinkle with oregano.
4.       Bake in the oven until the dough is cooked and cheese melted, approx. 15 minutes. Careful it doesn’t burn.
5.       You may wish to add herbs/rocket/chilli oil just before serving.
6.       Give a generous helping of black pepper, and a glass of crisp white wine is a must!


Sunday, March 4, 2012

Low Fat Spicy Meatballs


These low fat meatballs are made from very lean and nutritious turkey mince, making the meatballs extremely low fat and very high in protein. To make the meatballs really flavoursome and to give them a bit of a kick, dried oregano and chilli are added to the mixture. These flavours can be substituted to whatever tastes you wish. You may wish to give an oriental flare to them by adding ginger and five spice, our give them a middle eastern kick by adding harrisa perhaps.

The meatballs are quite versatile and if you cook a big batch, they are great for freezing also.

Meatballs always have a comforting quality that perhaps dieters might normally steer clear of, but by using turkey mince instead, and by baking the balls in the oven, then finishing them off in a zero fat fiery tomato sauce, nobody should feel deprived. In fact the freshness and lightness of this dish, in comparison to heavier meatballs made from red meat and breadcrumbs and heavy cream-laden sauces, is a great welcomed alternative both  the tastebuds and the waist line will appreciate.

Serves 4

Ingredients

Meatballs

  • 300g Turkey mince
  • 2 tsp Dried oregano
  • 1 egg
  • 1 onion, diced

Lot Fat Fiery Tomato Sauce

  • 6 chopped tomatoes
  • 1 tbsp of tomato puree
  • 1 tsp of olive oil
  • 1 pinch of sugar
  • 1 onion diced
  • 1/2 red chilli, deseeded and diced
  • 1 garlic clove, diced
  • 8 mushrooms, sliced
  • 1 tbsp of balsamic vinegar
  • basil leaves to garnish
Serve with pasta

Method


  1. Place the meatball ingredients in a mixing bowl and mix well.
  2. Wet you hands and with the help of a teaspoon to measure, mould the meatballs into little balls (roughly the same size)
  3. Place the meatballs on a lined baking sheet.
  4. Preheat the oven to 180 degrees and bake in the oven for 15 minutes.
  5. Meanwhile, to make the sauce, place a pan on a medium heat. Add the oil and saute the onion, garlic and chilli for 4-5 minutes. Add the mushroom sliced and saute for a further 2 minutes.
  6. Add the tomatoes and puree and  cook for 5 minutes.
  7. Add 2-3 tbsp of water and the balsamic vinegar. Stir well and simmer for 12-15 minutes. Add more water if it needs it.
  8. Place the cooked meatballs in the sauce and simmer for 5 minutes. Be careful that the meatballs don't break up, so gently fold into the sauce.
  9. Cook the pasta according to packet instructions and add the shredded fresh basil.


Related Posts Plugin for WordPress, Blogger...